Drupal Menu Editing Tutorial
Menus are an essential part of any Drupal site. They contain links to your pages and may link to pages outside of your site, known as external links. For instance, if your site is http://engineering.case.edu, a link on your site might be http://engineering.case.edu/about/, while an external link might be http://www.case.edu or http://www.google.com.
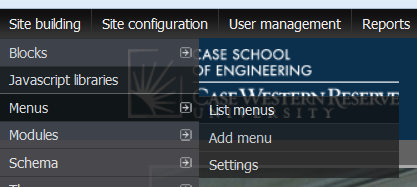
Once logged in to your website, use the black control bar to go to Menus -> List Menus.
From here, click on the menu you want to edit. For new sites, the main menu to the left contains links to your pages, and is called the “Primary Links” menu. However, this may not always be the case.
On the following page you should see a list of menu items. Each menu item is essentially a link to a page. The page/location it takes you to and the title of the menu link, as well as the order and other aspects, can be edited.
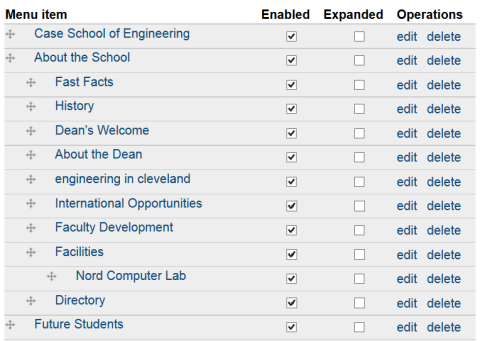
For instance, in the above example, “Menu item” is the actual link, with a crossbar located next to each link. Note that some links are indented and some are not: we will get to this shortly.
You can enable a link, or make it show in the menu, by checking the checkbox. If unchecked, the link will exist, but be hidden from view. Expanded isn’t vital, edit will let you edit the link, something we will explore in detail later, and delete will allow you to remove the link entirely.
To get an idea of what a menu item/link consists of, let’s create a new one. Find the bar pictured below and click on “Add Item”.

You’ll be asked to fill out some information:
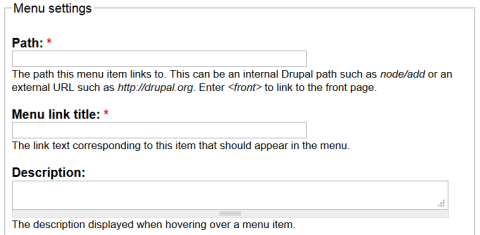
Path is as it describes: it could be a link to a page, such as about/, or a link to a site, such as http://www.case.edu.
The menu link title is the text to display on the menu. This is just a short title that should fit in the menu.
The description is optional and can be a few words describing the website, such as “Case Engineering Home” or something of that nature.
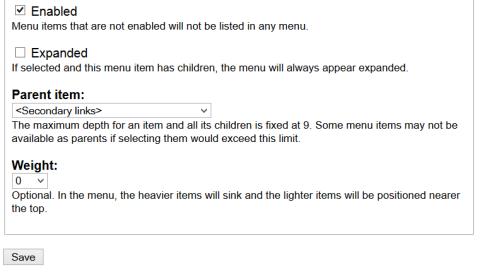
Below this, we’ve got the option to enable it or disable it by default, as explained before, and we can also set the “parent item” and “weight”, which work like they do with pages. As a reminder, this is a way of ordering the pages by making the link a “sublink” of another link (e.g. you hover over it and it will show another menu) as well as assigning an arbitrary value to the link called “weight” where the higher numbered links “sink” to the bottom and the lower numbered links “float” at the top.
However, because this isn’t intuitive for the average user, we can leave these blank and use a more intuitive way of ordering the links, which I will show in a minute.
When you’re done, hit the Save button. Scroll down to the bottom of the menu and you should see your menu item added. (If not, it may have wound up somewhere above.) I’ll now explain how to rearrange your menu links.
Let’s take this example below:
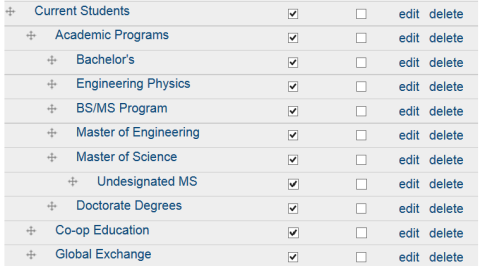
At the far left, we’ve got Current Students. Notice how the crossbar is to the very left of the area: this means it is part of the top tier of links. The link below it, Academic Programs, is indented a bit—what does this mean? The indentation means that Academic Programs is a sublink of Current Students. In terms of Drupal terminology, Academic Programs is the parent and Current Students in the child. Likewise, Bachelor’s, engineering Physics, etc. are children of Academic Programs. They are all in the same tier, denoted by the fact that their crossbars are vertically aligned/in the same column.
You can see this in practice by looking at the menus themselves:
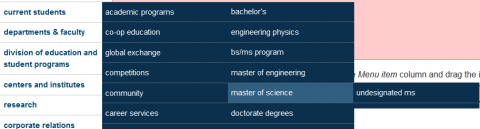
Notice how to the right of Current Students is Academic Programs, and to the right of that are yet more links. Every link is in its own tier, denoted by how far to the right is indented.
Generally speaking you do not want to have too many tiers because the menus get confusing and it becomes hard to find things: however, having some tiers of submenus can also be a good way to organize a site.
In order to change the order, simply drag the crossbar up, down, to the right, or to the left, wherever you want it. Upon doing so, that item will have a red asterisk next to it, denoting that it has been changed.

Once you are doing re-ordering pages and putting them where you want, be sure to click “Save Configuration” at the bottom, or your changes will not be saved.

If you happen to make a change you don’t want, you can always refresh the page and start again.
With that, you now know how to add external links and re-order them on the menu. If you need to add a link to a page, the best way to do it is by creating that page and adding the link via Menu Settings, or editing the page and editing the Menu Settings, which is covered in another tutorial.