Drupal Content Editing Tutorial
Note: If, at any time, you are unable to access a certain part of the site or do not see an option shown in the tutorial, please kindly ask your administrator to give you access.
Logging In
To login, you must first visit the login page of your website. This is the home URL with the word “user” at the end of it; for instance, http://engineering.case.edu/user would be the login page for the main engineering website.
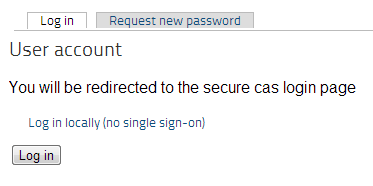
Then click “Log in” to login using your Case Network and ID. The login was successful if a black control bar appears above the page and the option to Log out is visible at the top-right of the page.
Creating a New Page
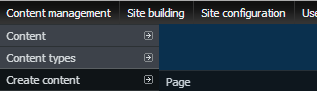
Under Content Management at the top, click “Create Content”, then click “Page”. A page is the most common type of content containing information and pictures and is essential to most websites.
You should now see various options and text areas to fill out below.
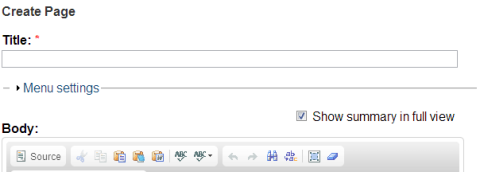
Note that anything marked with a red asterisk (*) is required for the page to be created.
The page title is the name of the page and should be something short if possible and appropriate, such as “Our Research” or “About Us”.
You can click on “Menu settings” to bring up further options regarding the menu. This allows you to add the page to a menu and control where it is, as well as what the name of the menu link is.
“Menu link title” is the name of the link, i.e. what will be displayed on the menu. If you do not wish to add the page to the menu, you may leave it blank.
“Parent item” refers to which section/menu the link is under. By default, it should be under “Primary links”; however, you may make a page a subpage by making its parent another page. For instance, an “About Us” page may have a “History” and “Contact Us” page as subpages.
“Weight” is a mechanism that controls where in the menu the link is placed. A lower number means it will “float” and be placed higher in the menu, while a higher number means it will “sink” and be placed lower in the menu, therefore the idea of “weight”.
The Body is arguably the most essential part of the page as it contains the actual text and other content of the page. This is where you type what you want people to see on the page. Much like Microsoft Word, there are various text formatting options, such as the ability to bold, italicize, and underline text, as well as make tables, align text, or change its size.
However, inserting images and links work differently, and we will cover how to do so below.
Inserting an Image
Begin by clicking the “Image” button, pictured here:  .
.
A menu like so should pop-up:
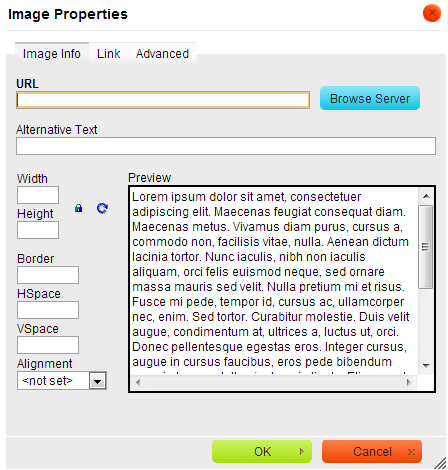
There are two ways to add an image. The first is to enter the URL of an image from online. For instance, the Google logo is located at: https://www.google.com/images/srpr/logo4w.png and by entering that under “URL”, we can add the image to our website. (However, be wary of copyrighted images when using images from online.)
The other option is to upload the image from our computer and onto the website. To do this, we must first select “Browse Server”. From here, select “Upload” at the top-left, then select “Choose File”.

You may then navigate to an image file on your computer and double-click it to choose it, then hit the Upload button to upload it. (Be careful to click the second one pictured at the bottom of the image above, and NOT the one you clicked to bring up the menu.)
Your image should now appear on the right. Double-click the name (or click it once and hit “insert file” at the top) to insert it.
Notice that upon entering an image, the Preview box will now show an example of your image being used in a page. Furthermore, you may now edit the various options given to you.
Alternative text is optional text regarding the image (e.g. a couple-word description or title for the image).
Width and height control the dimensions of the image. You may enter new ones to resize it if you wish. Notice that by default, changing one dimension automatically adjusts the other one: you can stop this by clicking the small lock to the right of the width/height boxes.
Entering a number for Border will add a black border to the image. Generally a small number such as 1 or 2 is appropriate.
HSpace and VSpace control the horizontal and vertical spacing respectively between the image and any text around it. This helps separate the text from the image (which simply put, often looks nicer). A value such as 5 or 10 may be appropriate here.
Lastly, “alignment” allows you to control where the image is in relation to the text. Setting it to “left” will place the image to the left and the text to the right, assuming there is enough space to fit both. Setting it to “right” will do the opposite, placing the image to the right and the text to the left. “None” will simply place text above and below the image, as opposed to next to it.
When you are done changing image options, hit “OK” to insert your image.
Inserting a Link
A link allows you to create text that someone can click on to take them to another website. To create a link, we may enter the URl directly, or we may enter text first and turn it into a link.
The link button is featured on the left below:

Click on it to bring up a small menu. To link to a page, make the link type “URL”; to link to an e-mail (that someone can click on and send an e-mail to), make the link type “E-mail”. Then simply enter the URL, such as www.google.com, or the e-mail address, such as yourname@example.com.
Afterwards, hit “OK” to create the link.
The alternate way to create a link is to enter text in the Body and highlight it. Then click the link button once more (pictured above) and enter the URL or e-mail address. This will turn the text into a clickable link just like before.
Extra Options
Once you are done creating the body of your page, you can click on the subsections below to see extra options available to you.
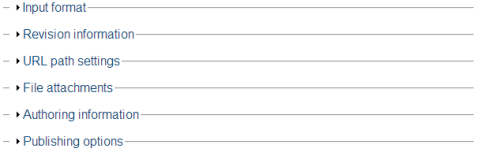
Input format is inessential to most pages and is not covered in this tutorial.
Revision information allows you to create a back-up of the page, also known as a “revision”. In the case that you make an edit to a page and wish to go back to how it was before, you may do so if and only if you have a revision. Therefore it is useful to create a revision by checking the box and leaving an appropriate log message, such as information on what edits you made, if you feel you may need to return to an older version of the page.
URL path settings allows you to enter an alias for the page. Simply put, this is just a nicer name for the page’s URL: for instance, instead of http://engineering.case.edu/node/72, you may want it to stay http://engineering.case.edu/mypage. In such a case, you would simply enter “mypage” and the system would take care of the rest.
File attachments work much like an e-mail and allow you to attach a file to the page itself. Note that there are certain file size and file type restrictions; essentially, you may only upload small documents or presentations to the website, unless given permission otherwise by your administrator.
Authoring information allows you to edit the name of the author if you so wish. It can be left blank unless you wish to enter a full name (as opposed to your Case ID).
Lastly, publishing options allows you to control whether the page is published or not as well as whether it will display on the home page or not. Simply check the checkbox to change the option. Note that unpublished pages will not be visible by viewers and will not appear in the menu.
When you are done, select “Preview” to preview the page, and “Save” to save your work and create the page.
Editing a Page
Once you have created the page, you may wish to edit it. To do this, navigate to the page either using the menu on the left or by going to Content Management -> Content -> List at the top and clicking on the name of the page.
Once you are there, you should see the option to View or Edit the page at the top. Simply click “Edit” to be brought back to the same page editor you used to create the page. Be sure to hit “save” to save your changes when you are done.