To start, login to your Drupal website so you can access the control panel at the top.
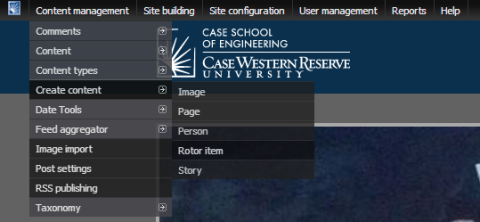
To add an image to the rotor banner, we must create a rotor image. Start by clicking “Content Management”, then “Create Content” and choose type “Rotor Image”, as shown below.
Scroll down on the Create Rotor Item page to view the information you can fill in.
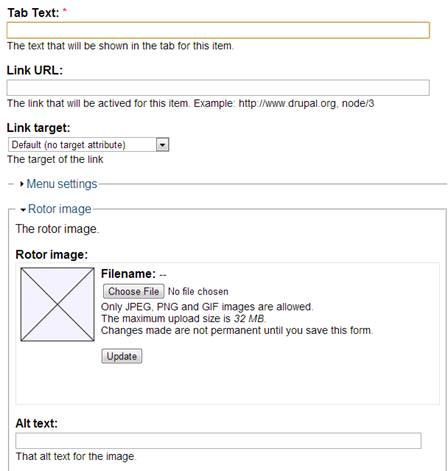
Tab Text is essentially the name of the rotor image. For example, “Group Logo” or “Research Banner 1”.
Link URL is the address of the website the banner will take the viewer to when it is clicked on. For example, if I set it to http://www.case.edu, when someone clicks on the banner, they will go to the Case homepage. Be sure to enter the full URL, including the “http://” part.
The link target is optional and controls whether the user will be taken directly to the new page when they click on the banner, or if a new window or tab will pop-up with the new page, while keeping the current page available.
The next important part is the Rotor Image section. Simply click “Choose File” to navigate to your banner image and either double-click it or click it once and hit “Open” to select the file.
Note that the banner image MUST match the size of the other banners or the rotor image will not display correctly.
Once you select the file, click “update” and make sure it uploaded, then feel free to enter a title for the image (completely optional) before scrolling down and hitting the “Save” button.
(Note that there are some other options but they are much like the ones in Creating a New Page and are not covered in this tutorial, nor are they essential to adding your rotor image.)
Assuming the rotor banner is correctly set up, it should now switch between all rotor images successfully, including the one you just added. If you wish to remove a rotor image, simply go to Content Management -> Content -> List to list all content, then locate the rotor item you wish to delete, click “Edit”, scroll down, and hit the “delete” button. Alternatively, you may use the checkbox next to the rotor item and delete it using the update options box located at the top of the Content List page.


Congratulations: you now know how to add and delete rotor images!