The paths cockroaches exploring unknown environments vary from individual to individual. We model their behavior with a state-based model we call RAMBLER. RAMBLER stands for Robotic Algorithm Mimicking Biased Lone Exploration in Roaches. All the state transition parameters were measured from cockroaches. We hope that this model might be insightful for helping robots explore better and might help us learn more about cockroach behavior, brains, and neurobiological control.
We recorded many cockroaches finding a shelter in a square arena, and from this we measured state transition parameters for our model RAMBLER. We test this model both in simulation on on robotic platforms, such as RamblerRobot, and we refine it based on additional cockroach experiments performed in the Ritzmann Lab.
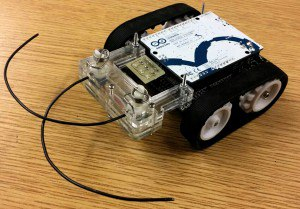
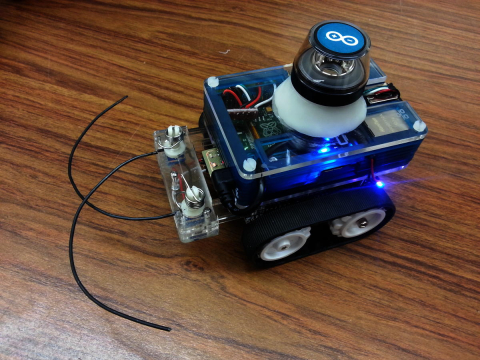
To analyze RAMBLER we’ve built an inexpensive robotic platform: The RAMBLER Robot. The main components are the Pololu Zumo chassis, the Arduino UNO low-level controller, and the Raspberry Pi high-level controller.
Bill of Materials
From www.pololu.com:
$29.95 – Arduino Uno R3
$42.95 – Zumo Robot Kit for Arduino (No Motors)
$31.90 – 100:1 Micro Metal Gearmotor HP
$4.95 – Pololu Voltage Regulator S7V7F5
($109.75 subtotal)
From www.adafruit.com:
$39.95 – Raspberry Pi Model B 512MB RAM
$5.95 – Low-profile microSD card adapter for Raspberry Pi
$19.95 – Adafruit Pibow Enclosure
($65.85 subtotal)
From www.sparkfun.com:
$1.95 – Logic Level Converter
$3.95 – Jumper Wires Premium 6″ F/F Pack of 10
($5.90 subtotal)
From www.McMaster-Carr.com:
$23.21 – Optically Clear Cast Acrylic Sheet 1/8″ Thick
$8.50 – Pack of 50 Type 316 SS Pan Head Phillips Machine Screw 2-56 Thread, 1″ Length
$10.57 – Metric Nylon 6/6 Hex Nut Off-White, M3 Size, .5mm Pitch, 5.5mm W, 2.4mm H
($42.28 subtotal)
From www.amazon.com:
$15.49 – SanDisk Ultra 16 GB MicroSDHC Class 10 UHS-1 Memory Card
$19.10 – eneloop NEW 2000mAh Typical, 8 Pack AA Ni-MH Rechargeable Batteries
$9.99 – InstaMorph – Moldable Plastic – 6 oz
$3.70 – Everydaysource 2 Pack of right angle Adapter : Micro USB OTG
$15.95 – Edimax EW-7811Un 150 Mbps Wireless 11n Nano Size USB Adapter
$6.99 – AmazonBasics HDMI to DVI Adapter Cable (9.8 Feet/3.0 Meters)
($71.22 subtotal)
From www.Kogeto.com:
$39.00 – “Naked” Panoramic Dot iCONIC optic
From www.newegg.com:
$19.99 – inland 86200 USB 2.0 WebCam
Total: $353.99
We hope to add some antenna components later.
Maybe it’s not all that cheap, but if you have some of this stuff lying around already you might get the price down to $200. For example, we didn’t have any batteries, so that was $20, and we lost a single nylon hex nut, so that was $10. Keep your screws and nuts in a dish or something!
We have access to some great tools, like a 120W Epilog laser cutter, a Dremel high speed rotary tool, and a Weller soldering iron. Screwdrivers and small wrenches were also necessary for this project. For the thermoplastic molding, a method of heating water to near boiling is essential. To reproduce the cap nut based 360-degree vision system, a miter box or lathe, and some epoxy or another method of joining acrylic is needed.
Assembly Instructions
RAMBLER Robot is easy to build.
First, assemble the zumo chassis as per the instructions on pololu’s website. The Users Guide may be helpful.
Next, modify and assemble the pibow case. Details can be found in the appendices of Charles Hart’s 2014 thesis.
The USB camera setup relies on perfboard and a thermoplastic like shapelock or instamorph. It is also possible to use the newly released Pi Camera through the CSI (Camera Serial Interface) port on your Raspberry Pi.
The antennae are built with lasercut acrylic layers, accommodating two potentiometers and steel wire mounted in 3D-printed flanges.
Finally, program the arduino and load the raspberry pi with the code found in the next section. You will need the Zumo libraries found here.
RAMBLER Robot code
Our public github repository includes C++ code for the Arduino and the Raspberry Pi, as well as some scripts and configuration files for the Pi.
Pin Assigments
| Digital Pins | Zumo Shield Function | Notes/Aleternative Function |
| 0 | digital I/O | RX for programming and serial communication on Uno and older Arduinos |
| 1 | digital I/O | TX for programming and serial communication on Uno and older Arduinos |
| 2 | digital I/O (front expansion) | I²C SDA on Leonardo and A-Star 32U4 Prime |
| 3 | digital I/O | optional jumper to buzzer control line for Uno and older Arduinos I²C SCL on Leonardo and A-Star 32U4 Prime |
| 4 | digital I/O (front expansion) | Status LEDs |
| 5 | digital I/O (front expansion) | Status LEDs |
| 6 | digital I/O | optimal jumper to buzzer control line for Leonardo and A-Star 32U4 Prime |
| 7 | right motor direction control line | |
| 8 | left motor direction control line | |
| 9 | right motor PWM control line | |
| 10 | left motor PWM control line | |
| 11 | digital I/O (front expansion) | Status LEDs, Mantis Claw |
| 12 | digital I/O | user pushbutton (pressing pulls low) |
| 13 | digital I/O | yellow user LED (high terns LED on) |
| Analog Pins | Zumo Shield Function | Notes/Alternative Functions |
| A0 | analog input and digital I/O (front expansion) | |
| A1 | analog input and digital I/O (front expansion) | optional jumper to battery level voltage divider |
| A2 | analog input and digital I/O (front expansion) | Whisker Left |
| A3 | analog input and digital I/O (front expansion) | Whisker Right |
| A4 | analog input and digital I/O (front expansion) | I²C SDA on Uno and older Arduinos |
| A5 | analog input and digital I/O (front expansion) | I²C SDA on Uno and older Arduinos |
Methods and Discussion
Sensors: Magnetometer, Antennae, Camera.
Actuators: We found the zumo chassis to be an excellent platform. The wheelbase was a little short, and the number of IO pins on the arduino was a little low, but as a whole it all turned out great. The 100:1 gear reduction on the motors seems ideal.